Home EV Charging Installation Made Simple: A Clear Step-by-Step Guide for Beginners
Installing an EV charger at home is becoming a smart step for many electric vehicle owners. It lets you charge your car conveniently overnight, saving trips to public stations and cutting down your charging costs by 20-50%. Having your own charger also means faster, safer charging tailored to your daily needs.
This guide will walk you through every step, from understanding different charger types to the electrical upgrades you might need. You’ll learn what to expect in terms of cost, installation process, and how to choose the right setup for your home. By the end, you’ll feel confident in setting up an efficient, reliable home EV charging station that fits your lifestyle.
Understanding Your Home EV Charging Options
Choosing the right home EV charger starts with knowing the basics about the two main types of chargers available for residential use. This helps you match your charger to your driving habits, electrical system, and budget. You’ll find clear differences in how fast these chargers work, how much they cost, and what they require from your home’s electrical setup.
Level 1 Charging: Basics and Use Cases
Level 1 chargers are the simplest and most affordable option. They use a standard 120-volt outlet—the same kind of plug you find in most rooms of your house. Because they rely on regular household power, charging your car with a Level 1 charger is slow. In most cases, you’ll get about 3 to 5 miles of range per hour of charging. That might sound low, but if you drive just 20 to 40 miles a day, plugging in overnight can be enough to keep your EV ready for the road.
The big advantages here are cost-effectiveness and convenience. You usually don’t need any electrical upgrades or special installation, and you can use the charger almost anywhere with a normal outlet. If your daily driving is low or you don’t mind charging slowly, Level 1 charging fits the bill without any fuss or extra expense.
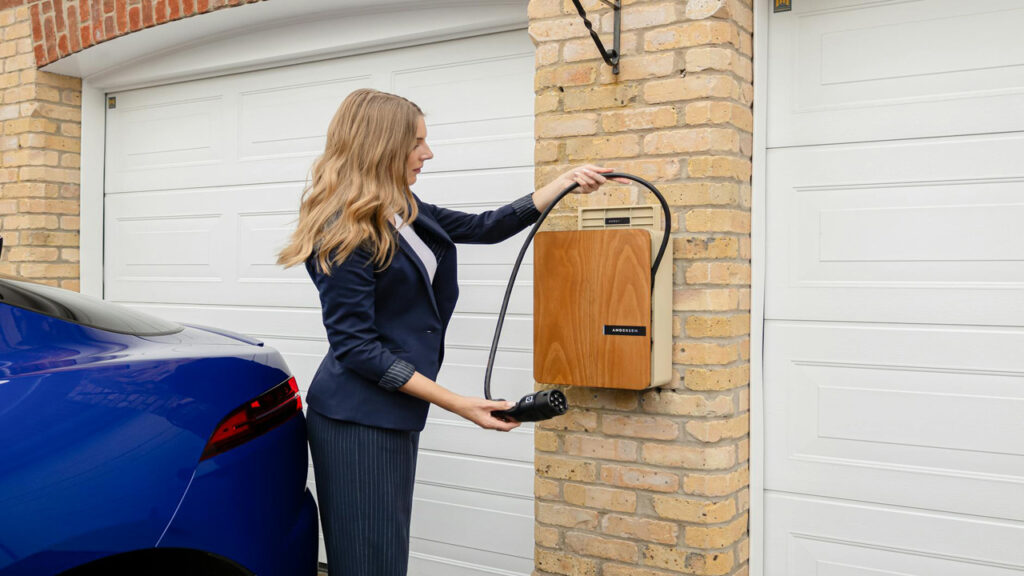
Level 2 Charging: Faster Home Charging Solution
Level 2 chargers step up the power by using a 240-volt circuit—similar to the power used by your electric dryer or oven. This higher voltage allows these chargers to refill your EV’s battery much faster, typically adding 15 to 30 miles of range per hour depending on the charger’s capacity and your vehicle.
Installing a Level 2 charger generally means adding a dedicated 240V outlet or hardwiring the unit into your circuit breaker panel. This involves some upfront cost—both for the hardware and professional installation—but the speed and convenience pay off if you drive longer distances or want to top up quickly between trips.
Typical Level 2 chargers come with features like:
- Adjustable charging speeds to protect your home’s electrical system.
- WiFi connectivity for monitoring and scheduling charging sessions via apps.
- Weatherproof design for outdoor installation.
- Cable lengths from 16 to 25 feet to reach your car’s charging port comfortably.
Choosing a Level 2 setup lets you fully charge an average EV overnight or even faster, providing peace of mind if you need to hit the road on short notice.

Photo by Andersen EV
Assessing Your Charging Needs and Driving Habits
Before picking a charger, spend a moment thinking about how you drive and how often you want to plug in. Look at:
- Your daily driving distance. Do you use your EV mostly for short trips or longer commutes?
- Your parking situation. Will the charger be indoors, outside, or in a detached garage?
- How soon you want your car charged. Are overnight charges fine, or do you need faster top-ups?
- Your home’s electrical capacity. Does your panel support a 240V upgrade, or is Level 1 your best bet?
If you drive less than 30 miles a day and mostly charge overnight, a Level 1 charger could be enough. But if you travel longer distances regularly or want the option to charge faster, the faster speeds of a Level 2 charger make sense.
Consider also how much you want to spend upfront versus convenience. Level 1 costs are nearly zero aside from the charger itself, while Level 2 installations can range from a few hundred to over a thousand dollars depending on electrician fees and electrical upgrades. Understanding these aspects puts you in control, helping you pick a charging setup that fits your lifestyle and keeps your EV ready to go.
By matching your charger to your daily driving patterns, you make sure that your home charging system is efficient, cost-effective, and hassle-free.
Preparing Your Home for EV Charger Installation
Getting ready to install an EV charger at home involves a few important steps. You’ll want to make sure your electrical system can handle the new load, get the right permissions, and find the best spot to mount the charger. Tackling these early helps avoid surprises later and makes the whole installation smoother. Let’s look at what you need to know.
Electrical Service Panel and Circuit Considerations
Most modern homes come with a 200-amp electrical service panel. This usually has enough capacity for a Level 2 EV charger, which runs at 240 volts and needs its own dedicated circuit. But if your home is older, with a 100-amp panel or less, you might need to upgrade before adding a charger.
Here’s what to keep in mind:
- Dedicated Circuit: Level 2 chargers require a dedicated circuit breaker, often rated between 30 and 40 amps, to avoid overloading your system. Sharing a circuit with other appliances isn’t safe or allowed by code.
- Panel Capacity Check: Calculate your current electrical load by reviewing major appliances and devices running on your panel. This helps you understand if there’s room to add an EV charger circuit.
- When to Upgrade: If panel space is full or the amperage isn’t sufficient, upgrading to a larger panel (like 200 amps) may be necessary. This ensures your system remains safe and reliable.
- Professional Assessment: Hire a licensed electrician to evaluate your panel and wiring. They can recommend the right circuit size and confirm whether your panel can handle the extra demand.
Installing an EV charger without making sure these electrical basics are covered risks tripping breakers or even fire hazards. Proper planning keeps your home’s power system solid and ready.
Permits, Building Codes, and Safety Regulations
Before any wiring begins, check the local rules. Installing a home EV charger isn’t always as simple as plugging in; it usually requires a permit and must meet specific safety codes.
Key points include:
- Obtaining Permits: Most municipalities require an electrical permit to install a high-voltage charger. This helps ensure the installation meets safety and quality standards.
- Building Codes Compliance: Your installation should follow local building codes and the National Electrical Code (NEC). These rules cover wiring methods, breaker sizing, grounding, and protection measures.
- Inspection Process: After installation, an official inspection confirms everything is done correctly and safely. Passing this inspection is often mandatory before you can activate the charger.
- Safety First: Registered electricians understand these regulations well, keeping your home safe and avoiding problems with insurance or resale.
Skipping permits or ignoring codes can lead to fines or unsafe setups — so do this step right the first time.
Choosing the Installation Location
The place you put your EV charger matters a lot for everyday convenience and safety. Ideally, pick a spot that minimizes hassle and protects your charger from damage.
Consider these factors:
- Proximity to Parking Spot: Mount the charger within easy reach of your vehicle’s charging port. This usually means placing it on a nearby wall in your garage, carport, or right beside your driveway.
- Weather Protection: Outdoor chargers need shelter from rain, snow, and sun to last longer. If your charger isn’t designed for full weather exposure, install it indoors or under a cover.
- Cable Management: Look for a location where the charging cable can be neatly stored and won’t be a tripping hazard. Cable length usually ranges from 16 to 25 feet, so make sure it can comfortably reach your car without stretching or tangling.
- Access to Electrical Panel: Position the charger close enough to your main electrical panel or subpanel to simplify wiring and reduce installation costs.
- Future Expansion: If you plan to add more EVs later, leave room for additional chargers or circuits nearby.
Finding the right spot upfront makes charging easy and keeps everything safe and tidy around your home.

Photo by Ksenia Chernaya
Step-by-Step Guide to Installing Your Home EV Charger
Installing your own EV charger might sound like a big job, but breaking it down into clear steps makes the process manageable and straightforward. This part of the journey starts with some smart planning and finishes with the first time you plug in your car at home. Here’s how to get from zero to a working home charging station without the headaches.
Consult a Licensed Electrician and Obtain Permits
Before you grab any tools or chargers, your first move is to team up with a licensed electrician. They are crucial for making sure your home’s electrical system can handle the charger safely.
- Schedule a home electrical assessment with your electrician to check your panel capacity and wiring.
- The electrician will tell you if your panel can handle a new dedicated circuit or if you’ll need an upgrade.
- Together, apply for any required permits. These are usually mandatory for EV charger installations and make sure everything meets local codes.
- Permits and inspections protect you by ensuring your installation is safe and up to code.
Skipping this step can lead to unsafe setups or costly fixes later. Using a pro from the start gives you peace of mind.
Installing a Dedicated Circuit and Mounting the Charger
Your EV charger needs its own power supply to run safely and efficiently. Here’s what happens next:
- The electrician installs a dedicated 240-volt circuit breaker sized to your charger’s requirements. Usually, this is between 30 and 50 amps.
- New wiring runs from your electrical panel to the charger location. This wiring is designed to handle continuous high current safely.
- Once the circuit is ready, the charger unit is mounted. Most chargers attach to a sturdy wall or a mounting post close to where you park your car.
- Mounting takes into account cable length and ease of access so connecting your car is simple every time.
This electrical work is best done by your electrician to avoid risks and comply with safety codes.
Connecting the Charger and Conducting Safety Tests
With the charger physically mounted and wired, it’s time to make sure everything connects properly and safely.
- The electrician wires the charger into the dedicated circuit, ensuring strong connections and proper grounding.
- Grounding protects you and your home by providing a safe path for electrical faults.
- The system undergoes initial tests to check voltage, amperage, and response to safety devices like breakers and ground-fault interrupters.
- These tests confirm the charger is fully functional and won’t overload your electrical system.
This phase is critical—it prevents hazards and guarantees your charger performs exactly as it should.
Final Inspection and Starting to Charge Your EV
One last step before you plug in your car involves an official inspection.
- Local building or electrical inspectors review the installation to verify it meets all codes and was done correctly.
- Passing this inspection is usually required before you can use your charger legally.
- Once approved, you’re set to plug in your EV. Your new home charger lets you top up your battery overnight or whenever it’s convenient.
- Enjoy the comfort and savings of having your own reliable, safe charging station at home.
Starting your EV charging at home after these steps means you’ve done it right from the start.

Photo by Kindel Media
Costs, Incentives, and Long-Term Considerations
Installing a home EV charger means more than just picking a device and sticking it on your wall. You’ll want to plan for expenses, explore money-saving perks, and think about how your choices affect your bills and home long-term. This section breaks down what you can expect to pay, highlights valuable incentives, and offers tips to keep costs and energy use in check.
Typical Costs for Hardware and Installation
Getting a home EV charger up and running comes with several costs, each varying by your home setup and the charger you choose.
- Charger Purchase: Level 2 chargers typically range from $400 to $1,200. Models with smart features like app control or faster charging usually cost more.
- Electrical Work: Hiring an electrician for installation costs about $300 to $1,000 or more. This covers running dedicated wiring, installing a new circuit breaker, and mounting the unit.
- Permits and Inspection Fees: Many areas require permits, which can add around $50 to $200. Inspections ensure your setup meets electrical safety codes.
- Panel Upgrades: If your electrical panel is old or maxed out, upgrading to support the charger could cost $1,000 to $3,000 or more depending on your home.
Putting it all together, the total cost for installing a Level 2 charger at home usually falls between $800 and $4,000. The wide range depends mostly on the complexity of electrical upgrades and local labor rates. Level 1 chargers are much cheaper, often just the cost of the charger itself, since they plug into standard outlets and usually don’t need additional wiring.
Knowing these numbers early helps you budget and set realistic expectations for your home charging project.
Federal and State Incentives and Rebates
Good news: there are ways to lower your upfront costs through government programs.
- The current federal tax credit covers 30% of your charger’s hardware and installation costs, up to $1,000. This means if your total project costs $3,000, you can get $900 back as a credit on your taxes.
- Many states, utilities, and local governments offer additional rebates or incentives. Some cover a flat dollar amount, others cover a percentage of your costs, sometimes up to 50% of the install.
- To claim the federal credit, you’ll need to keep receipts and file IRS Form 8911 when you do your taxes.
- State programs vary widely, so checking your local energy or utility company’s website is a smart step. Some offers expire or have limited funds each year, so acting quickly pays off.
Combining these incentives can make installing a home charger a much lighter investment. They’re there to help you join the EV movement without breaking the bank.
Tips for Reducing Installation Costs and Energy Use
If you’re looking to save on your installation and ongoing electric bills, these practical tips can help:
- Bundle installations: If you’re upgrading your electrical panel or installing solar panels, schedule the EV charger install at the same time. This saves you extra labor and permit fees.
- Charge during off-peak hours: Many utilities offer lower rates at night. Using a smart charger to schedule charging can reduce your electricity costs considerably.
- Integrate solar power: Adding solar panels to your home allows you to offset charger electricity with clean energy, shrinking your utility bills.
- Choose optimal charger location: Putting the charger close to your electrical panel minimizes wiring distance, cutting installation time and material costs.
- Shop around for electricians: Get multiple quotes and check reviews to find a reliable professional at a fair price.
Read Also: How to Choose the Best Electric Car for Your Lifestyle in 2025 | Updated Buyer’s Guide
These steps help you keep your wallet happy while enjoying the convenience of home charging. Plus, they contribute to a greener, more energy-efficient lifestyle.

Photo by Antoni Shkraba Studio
Maintaining and Troubleshooting Your Home EV Charging Station
Setting up your EV charger at home opens the door to convenient, cost-effective charging. But like any electrical device, it needs some care to keep running smoothly and safely. Regular maintenance not only extends your charger’s life but helps you spot small problems before they grow. When issues do come up, knowing how to troubleshoot simple glitches can save you time and frustration. And for certain fixes, professional help is the safest way forward.
Regular Maintenance Tips for Longevity and Safety
Keeping your EV charger clean and checked regularly is key to reliable charging day after day. Here’s how to look after your unit:
- Clean it carefully: Dust, dirt, and grime can build up on your charger and cables. Wipe the charging unit and cords with a dry, soft cloth once a week. Avoid water or harsh cleaners, and always unplug the charger before cleaning to stay safe.
- Inspect cables and connectors: Run your hands along the charging cable to check for cracks, frays, or stiffness that could indicate wear. Look inside the connectors for dirt, corrosion, or bent pins. Damaged cables should be replaced immediately.
- Watch the charger’s performance: Keep an eye on the indicator lights and any connected app notifications. Unusual flashing lights or error messages can hint at a developing issue.
- Protect from weather: If your charger is outside, make sure it’s shielded from rain or snow. Check seals and enclosures for cracks that might let moisture in.
- Schedule annual checks: Even if nothing looks wrong, have a licensed electrician inspect your charging system yearly. They’ll tighten connections, test electrical safety features, and verify everything runs smoothly.
Regular attention like this is similar to servicing a car—it won’t just keep your charger working longer but will keep charging safe and trouble-free.
Troubleshooting Common Charging Problems
When your charger acts up, don’t panic. Many common problems have straightforward fixes you can try first:
- Charger won’t power on:
- Check your home’s circuit breaker; a tripped breaker could cut power to your charger.
- Verify the charger is plugged in properly and the outlet is working.
- Restart your charger by unplugging it and plugging it back in after a few minutes.
- Slow charging speeds:
- Confirm your vehicle supports the charger’s maximum speed. Some EVs limit charging rates.
- Inspect the cable for damage—it might reduce current flow.
- Avoid charging during peak energy use hours; your utility may throttle power availability.
- Connectivity or app errors:
- Restart your WiFi router and charger.
- Check for firmware updates for your charger via the manufacturer’s app.
- Re-pair the charger with your phone or home network if the connection fails repeatedly.
- Charging stops unexpectedly or interrupts:
- Ensure the car’s charging port and cable connectors are clean and securely connected.
- Look for error codes on your EV or charger display and consult your user manual for their meaning.
- Leave space around the charger for ventilation—overheating can trigger shutdowns.
Try these steps before calling for help; many issues resolve with simple resets or inspections.
When to Seek Professional Help
While many maintenance checks and minor troubleshooting tasks you can handle yourself, some problems require a pro’s expertise to keep things safe:
- If your charger or cables show signs of electrical damage like sparks, melting, or burnt smells, disconnect it and call an electrician immediately.
- Problems involving your home’s electrical panel, such as frequent breaker trips when charging, usually point to circuit issues that need a licensed electrician.
- Persistent error codes or charging failures after you’ve tried resets and cable swaps may require diagnostics and repairs by the charger’s manufacturer or authorized service.
- Upgrades or replacements related to wet or corroded components exposed to weather should always be handled by professionals.
Safety should always come first. If you’re uncertain or uncomfortable with any troubleshooting or maintenance step, ask a licensed electrician or your charger’s support team to avoid risks.
Photo by Pixabay
Conclusion
You’ve seen how setting up a home EV charger lets you charge safely, save money, and gain convenience. From choosing the right charger to getting professional help, each step matters for a hassle-free installation.
Owning your own charger means being ready to drive anytime without detours or wait times. It’s a smart way to enhance your EV experience and cut down on charging costs.
Now is a great time to consider adding a charger at home, especially with incentives that help lower your upfront expense. Thinking about your daily driving and your home’s setup will guide you to the right choice.
Read Also: How to Choose the Best Electric Car for Your Lifestyle in 2025 | Updated Buyer’s Guide
Thanks for investing your time in this guide. Share your own installation stories and questions—you might inspire others ready to make the switch to home EV charging.

